THE BEET: Volume 14, Issue 1
In this week’s BEET:
- Welcome!
- Bring Plastic Bags
- This week's share
- Windflower Farm News -- Letter from Farmer Ted
- Recipes
- Caring for potted sage/thyme (in this week’s share)
- Storage Tips
CSA Pickup Today 5-7:30pm
PS 56 at Gates and Downing (enter on Downing)
THIS WEEK:
FULL SHARES
GREEN WEEK HALF SHARES
YELLOW WEEK HALF SHARES:
Pick Ups Begin 6/18
Welcome to the 2015 Season
To all the new members; thank you all for taking the time to sign up and become a member of the Clinton Hill CSA, and to all our returning members; we are so glad to have you back! Being a part of a CSA is am important way to make a difference in the slow food movement. You're supporting a local farmer (Ted Bloomberg in our case) growing food without chemicals, and paying their workers a decent living wage. You're taking control over what you and your family eats by knowing exactly where your food comes from, what was used to grow it, and what it took to get to the pick up site, and you're helping lower your carbon footprint. There is no trash packaging. All the vegetables are brought to the pick up site in reusable bins, and you all bring your own bags. It's a great system. We hope you feel great about your decision to be with us, and know that your choice is a small step to start making a big difference in the way our country thinks about food. Thank you, and Welcome!
Bring Plastic Bags!
If you're like most of us, you have a giant pile of plastic bags in your kitchen that you're never going to use. Please bring them to the CSA pickup to add to our store of bags for your fellow CSA members, who from time to time forget to bring their own bags to the pickup.
This Week's Share
- Spicy Bunched Arugula
- Red Romaine Lettuce
- Bok Choy
- Rainbow Chard
- Dinosaur Kale
- French Breakfast Radishes
- Baby Bunched Garlic (chop and use like regular garlic, stems included)
- Scallots (Shallot greens)
- Choice of Potted Sage or Thyme
Letter From Ted
Spring greetings from Windflower Farm. We are very pleased you have decided to join our CSA for the 2015 season.
Jan (Ted's Wife) made vegetable wraps for dinner last night. Hers contained sweet potato, onion, quinoa and sautéed kale, and she made the wrappers out of lightly steamed choy greens (Swiss chard, kale and collards are also fine for this). She scrambled eggs and sautéed Swiss chard this morning for breakfast wraps made from collard leaves. We have been gradually doing away with tortilla wraps in favor of green wraps, and find that, besides being the healthier alternative, it’s a very nice use of surplus cooking greens. If not steamed too much, the more mature greens hold up well to beans and rice and tender meat fillings.
As I write this I don’t know if we’ll have fruit this week. It’s strawberry season, but the alternating hot, cold, dry, wet weather has been hard on them. This morning’s rain here has made the harvesting of quality berries a challenge. Keep in mind that the fruit share lasts for just 20 of our 22-week vegetable season because of challenges like these.
Next week we’ll be sending all kinds of cooking and salad greens, scallions and more green garlic bunches, potted basil, radishes and kohlrabi (time to pull out the annual kohlrabi recipe!).
This week on the farm, we will finish planting our sweet potato and winter squash crops, we’ll transplant another of our many successions of salad greens, we’ll sow cauliflower, we’ll trellis a greenhouse full of tomatoes, we’ll weed lettuces and carrots and beets, and we’ll work on the fencing in our back fields where deer have come in to graze on their favorite crops – red beet tops and green Romaine lettuces.
Keep your expectations modest for the first few weeks. The weather here has been cool and, until recently, very dry, which has set the harvest clock back by two to three weeks. Good things will come soon. In the meantime, enjoy a salad!
Yours Sincerely, Ted
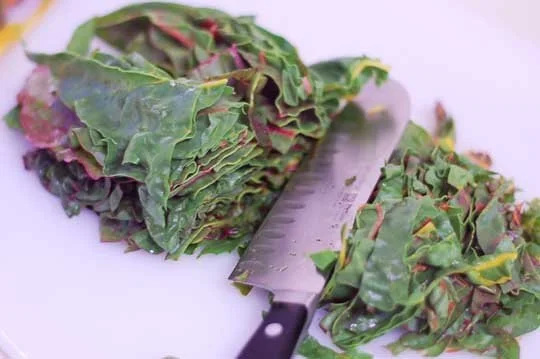
Basic Technique: How to Prepare Chard (or any other leafy green)
From The KitchN
Facing a big pile of leafy green chard and knowing you have to somehow get it sliced it into bite-sized ribbons can feel a bit daunting. But it's really a lot easier than you might think! Here's how we do it:
First things first, give your chard a good rinse in the sink. Even greens bought at the grocery store can carry a lot of grit and dirt in the leaves. We usually fill up the sink with warm (not hot) water and give the chard a good swish. The grit rinses away and sinks to the bottom.
We use a kitchen towel to pat the excess water from the leaves, but we don't really worry about getting them completely dry. During cooking, the extra moisture will turn to steam and help the chard to cook.
The next step is to remove the center stem. We find that the easiest way to do this is to fold the leaf in half and use our fingers to tear out the stem. It should separate pretty easily from the leaf. If this doesn't work for you, try stacking several leaves on the cutting board and using a knife to cut out the center stems.
Save those stems! We think they taste like a cross between celery and broccoli, and they're great in a stir-fry. If you can't use them in whatever you're cooking right now, put them back in the fridge for another night.
And finally, we get to the fun part!
Stack several of the de-stemmed leaves on top of each other and cut them into long ribbons - thick or thin, it doesn't matter. If you want shorter ribbons, cut the stack in half lengthwise and then slice the ribbons crosswise. Hold the stack with your non-cutting hand in the claw position to keep the layers in place, and work in a few batches so you're not trying to cut too much at once.
This is also how you'd prepare any other leafy green, like kale or spinach. It can feel like a lot of work for only one ingredient, but we always find that it goes faster than we think. Plus, there's something immensely satisfying about reducing a big awkward bunch of leaves into a tidy bowl of ribbons ready to be cooked!
Recipes
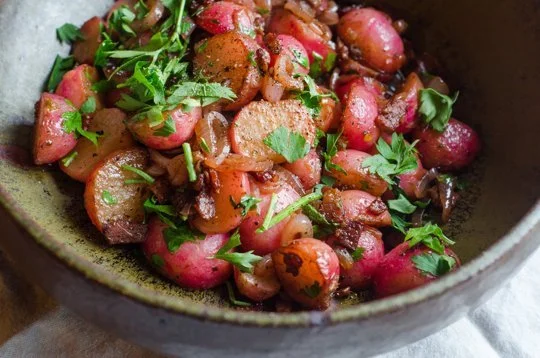
Braised Radishes with Bacon (from The KitchN)
Radishes Braised with Shallots and Vinegar
Serves 2 to 4 as a side dish
1 tablespoon butter
2 slices bacon, diced (or Tempeh Bacon)
2 large shallots, finely sliced
1 pound radishes, about 2 bunches, tops trimmed and radishes sliced in half
2 tablespoons balsamic vinegar
1/2 cup water
2/3 cup finely chopped Italian parsley
Salt and freshly ground black pepper
Heat the butter and bacon over medium-high heat in a wide, heavy skillet — preferably cast iron. Cook for about 5 minutes. When the bacon is cooked through and getting crispy, place the radishes cut-side down in the pan and cook undisturbed for 2 to 3 minutes or until the bottoms begin to brown. Add the shallots and cook, stirring, for another minute.
Add the balsamic vinegar and the water — the water should just come up around the sides of the radishes. Cover, lower the heat, and simmer for 8 to 10 minutes, or until the radishes are tender.
Remove the lid and continue to simmer for 3 to 4 minutes, or until the liquid has reduced into a syrupy sauce. Add the the parsley and stir to wilt.
Season with salt and pepper and serve.
Tips for Potted Sage and Thyme
POTTED SAGE
Sage is native to the Mediterranean coast, and it prefers a sunny spot and well drained soil. It is a plant that is easily killed by over watering, so use a container with drainage holes. Soil: use a fast draining potting mix, such as a cactus mix. Place in direct sun if possible and turn the plant every so often as it will grow towards the window. Water thoroughly, but allow the top of the soil to dry out in between waterings; sage will not tolerate soggy soil.
POTTED THYME
Thyme is also native to the Mediterranean regions as well as Asia. It, like most herbs, prefers a sunny spot and well drained soil. The root system is roughly the same size as the leaves, so choose a pot that gives it room to grow, and one that has drainage holes. Thyme wants to be in the brightest window sill in your house, and like sage, let the soil dry out a little between waterings. Regular trimming of the leaves will help the plant grow into a full bushy shape, and prevents spindly growth
Storage Tips for Greens
THE ROLL-UP TOWEL METHOD
Pull off all the leaves of your lettuce, kale, chard, whatever your greens on hand. Wash well, and then dry off with salad spinner. Lay each leaf out on a bath or kitchen towel, and let sit for a 15 more minutes or so to dry off any additional water left on the leaves. Then, roll up the towel with the leaves inside, and store in your vegetable drawer. This will keep greens fresher longer, and help protect them from rot.